Page 21 - ITAtube Journal 1 2024
P. 21
Technical Papers
  In DIN EN ISO 12780-1, straightness is defined as the “deviation of a point on the straightness profile from the reference straight line”. But at which points should straightness be measured on a free-form product such as an ERW squared tube? Or where should the reference line be placed?
DIN EN 10305-5, for example, specifies that the light gap of the concave bent side of a square tube is to be evaluated in relation to a ruler (reference).
However, this approach to straightness assessment is ambiguous. This is based due to the fact that in almost all stand- ardization papers, cross-sectional defects (roundness, radii, perpendicularity) are considered separately from longitudinal defects (straightness or twist).
To understand this ambiguity Figure 2 pre- sents three pipe segments with an identical concave straightness deviation on the same side (e1 = e2 = e3). Tube a) is concave on the opposite side with the same oddity. According to the standard, the product might be be labeled with an error e1 even though it has none. In case b), the concave bent side is measured with the straight- ness error e2. Since the opposite side is convexly bent with the same deflection, the tube is actually odd. Even more ambiguous would be case c), where the product on the convex bent side might be specified as still OK, but it would no longer be straight on the opposite side due to a cross-sectional deviation (within the cross-sectional toler- ance).
In summary, it should be noted that an assessment of the straightness of e.g. ERW pipes due to longitudinal variances in the cross-sectional geometry is ambiguous!
3. Weightless ContouringTM - The concept
In order to solve the ambiguity described above, it may seem obvious to use state- of-the-art profiling measurement systems. The color representations of a contour of the profiled pipe are well known on the market.
ITAtube Journal April 2024
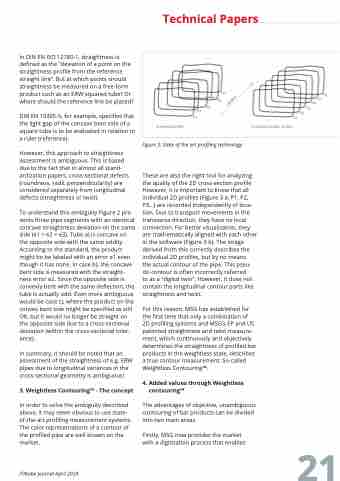
Figure 3: State of the art profiling technology
These are also the right tool for analyzing the quality of the 2D cross-section profile However, it is important to know that all individual 2D profiles (Figure 3 a; P1, P2, P3...) are recorded independently of loca- tion. Due to transport movements in the transverse direction, they have no local connection. For better visualization, they are mathematically aligned with each other in the software (Figure 3 b). The image derived from this correctly describes the individual 2D profiles, but by no means
the actual contour of the pipe. This pseu- do-contour is often incorrectly referred
to as a “digital twin”. However, it does not contain the longitudinal contour parts like straightness and twist.
For this reason, MSG has established for the first time that only a combination of 2D profiling systems and MSG’s EP and US patented straightness and twist measure- ment, which continuously and objectively determines the straightness of profiled bar products in the weightless state, describes a true contour measurement: So-called Weightless ContouringTM.
4. Added values through Weightless contouringTM
The advantages of objective, unambiguous contouring of bar products can be divided into two main areas.
Firstly, MSG now provides the market with a digitization process that enables
21


